Home → ManagedMissions FAQ → Printer Friendly Version
ManagedMissions FAQ
- 1. E-Signature Integration
- 2. Markdown
- 3. Online Donations
- 4. Contribution Management
- 5. Integration and Church Management Software
1. E-Signature Integration
1.1. SignNow and E-Signature Setup
Connecting SignNow and ManagedMissions
Before starting to use the E-Signature feature from ManagedMissions it is required to set up a SignNow account. Login to app.managedmissions.com and follow the next steps:
Step 1. Click Account Admin from left menu (fig.1):
Step 2. Select “E-Signature” option under Account Settings (fig.2):
Figure 2: Account Admin Option
Step 3. Click the button “Connect with SignNow” to continue the authorization process (fig.3)
Figure 3 Connect with SignNow
Step 4. Fill out the form adding the SignNow administrator email address and password (fig.4):
Figure 4: SignNow login page
Step 5. Click the button “Grant access to SignNow” to continue (fig.5):
Figure 5: Grant access
Step 6. The “Default Template Folder” displays the template and the shared folders configured in your SignNow account (fig.6).
To know more about how to configure this option in SignNow please visit the section below on Templates.
Figure 6: SignNow account successfully connected
E-Signature Integration - Templates
Once you connect SignNow with ManagedMissions the system displays a view where you can do some actions over the templates such as: upload, delete, download and a link to edit the template in the SignNow editor.
Figure 7: Edit templates
Upload a Template
The system provides the ability to upload templates files to SignNow through ManagedMissions:
Step 1. Select and save the “Default Template Folder”
Before uploading a template to SignNow, choose the “Default Template Folder” and click on “Save” button (fig.8):
Figure 8: Default template folder
Step 2. Upload a New Document for E-Signature
Once you have selected the template folder, you are now ready to upload a new template document by clicking the “Upload a New Document for E-Signature (fig.9).
Figure 9: Upload a new document for E-Signature
Choose the document to upload and click the “Add” button (fig.10) to start the uploading process.
Figure 10: Upload a new document for E-Signature
Please be aware that the allowed extensions are: .docx, .doc, .pdf, .png, .jpg or .jpeg. The system displays an error message if you try to upload a document with a different extension (fig.11)
Figure 11: Error message, invalid document format
Step 3. Edit in SignNow (optional)
After the uploading process completes a dialog box is displayed with a preview of the document (fig.12).
Figure 12: Document preview
To add fields to the document you can click the button “Edit in SignNow”, this open in a new tab the uploaded template in the SignNow editor (fig.13):
Figure 13: SignNow fields editor
Delete a Template
The SignNow templates can be deleted using ManagedMissions. Please follow next steps to delete a template document:
Step 1. Expand the menu
Select the menu on the right side of the chosen template to delete (the 3 dots “…”). Click to expand the options (fig.14):
Figure 14: Menu expanded
Step 2. Delete
The system will pop up a confirm dialog (fig.15) or the system could let you know if the selected template is associated with a task (fig.16):
Figure 15: Confirm delete dialog
Figure 16: Confirm delete template dialog sample with a task associated
SignNow’s shared Templates
The shared templates from SignNow easily distribute documents to members. If you want to know more about how setup this feature into your SignNow account please visit this link: https://www.signnow.com/features/manage-shared-templates
All the shared templates in SignNow (fig. 17) are listed in ManagedMissions (fig.18):
Figure 17: SignNow Shared Templates folder
Figure 18: The SignNow shared folders are displayed in the “Default Template Folder”
Create E-Signature Task
Once your SignNow is connected to ManagedMissions they system will be configured to create “E-Signature” tasks.
Follow the next steps to create an E-Signature task:
Step 1. Select “Tasks & Goals”
Choose the mission trip to create a new task and select “Tasks & Goals” option from the left menu (fig.19):
Figure 19: Task and goals
Step 2. Choose E-Signature Task
Choose “E-Signature” from Task Type and select the template from the “List of Templates” list box. Click the “Save” button to continue (fig.20):
Figure 20: E-Signature task
Step 3. Team Member Document: Pending Status
The system redirects to a new page with the information related to the E-Signature task created. Initially, the statuses of all documents for each team member are “Pending” statuses (fig.21).
Figure 21: Pending status
Step 4. Team Member Document: Sent Status
When the system completes the email sending process for each team member the status changes from “Pending” to “Sent”. Please be aware this process can take up to five minutes (fig. 22):
Figure 22: Sent status
Step 5. Menu Option
A menu option is displayed for each team member for document to be signed. This menu allows for the ability to cancel or resend the invite (fig.23).
Figure 23: Menu Option
Step 6. Team Member Invitation
Each team member receives and email with the information to open the SignNow invite (fig.24):
Figure 24: Email Sample
Step 6. Team Member Open Invite
The “Open Invite” shows up as copy of the template in the SignNow editor for signing (fig.25):
Figure 25: SignNow editor
Step 6. Team Member Document: Completed Status
When a document is signed the system will change the status of the document from “Sent” to “Completed” (fig.26):
Figure 26: Completed status
2. Markdown
2.1. Using Markdown
Using Markdown
Markdown is an editing language converted from HTML which allows you to format text using plain text.
Follow the formatting to create a text that looks like this:
Italic
Use asterisks or underscores to create italicized words:
*Italicized words*= Italicized words
_Italicized words_ = Italicized words
Bold
Use 2 asterisks or 2 underscores to create bold words:
**bold words** = bold words
__bold words__ = bold words
Headers:
Headers are defined by preceding your text with one or more # corresponding to header levels.
# A Heading =A Heading
## A Subheading= A Subheading
### A Sub-subheading= A Sub-subheading
Links:
Use [Text] follow by (URL) to have a text pointing to a link
[Google](http://google.com) = Google
Or simply wrap the link with < >
<http://google.com> = http://google.com
Email:
Use [Text] follow by (mailto:email) to have an email link
[Email Text](mailto:test@managedmissions.org) = EmailText
Images:
Use ![ ] follow by (URL) to display an image:
 =
Lists:
Use numbers, asterisks or dashes for lists
1. List 1
2. List 2
Will appear as:
- List 1
- List 2
* List 1
* List 2
Will appear as:
- List 1
- List 2
- List 1
- List 2
Will appear as:
- List 1
- List 2
Blockquotes:
Use > to quote:
>
# code block
print '3 backticks or'
print 'indent 4 spaces' =
Cheat sheet
Type | or | ..to Get |
*Italic* | _Italic_ | Italic |
**Bold** | __Bold__
| Bold |
# Heading 1 | Heading 1
| Heading 1 |
## Heading 2 | Heading 2
| Heading 2 |
[Link](http://a.com) | [Link][1]
|
|
 | ![Image][1]
|
|
> Blockquote |
|
|
* List
| - List
|
|
1. One
| 1) One
|
|
`Inline code` with backticks |
|
|
```
|
····# code block
|
|
3. Online Donations
3.1. Pushpay
Connecting Pushpay and ManagedMissions
1. Login to ManagedMissions as the administrator
2. Click Account Admin from left menu:
3. Go to Account Settings > Online Donations:
4. Check the checkbox “Enable Online Donations” and click the link “Set up Pushpay Connect”. The system will redirect to the Pushpay site to continue the authorization process.
5. Enter your email and password:
6. Click the “Authorize” button to continue process.
7. The system will redirect back to ManagedMissions and you will need to select a Merchant and a Fund. Click the “Save” button at the bottom of the page to save all changes.
8. After clicking “Save” this view will be displayed with the options of “Test Connection” or “Disconnect” from Pushpay.
9. After successfully setting up Pushpay in Account Admin settings, you can change the “Fund” on a specific trip by going to the trip > Trip Details tab > Edit (Trip Information box). Go to the dropdown “Pushpay Fund”, choose the fund you would like to use for the trip and click “Save.”
If you have troubles during the setup process, please contact us at help@managedmissions.com.
4. Contribution Management
4.1. ACH Donations
ACH for Stripe
- Account Admin > Account Settings > Online Donations > Enable ACH Donations
- When ACH Donations are enabled your donors have the option to choose to make a donation by Bank Account. This feature is only available if you are using Stripe as your payment processor.
-
-
- During the donation process the donor will be prompted to enter in their Bank Account information when choosing to pay via ACH:
-
-
-
- After entering in their Bank Account information, they will receive a confirmation email with instructions on the next steps
- After receiving 2 micro deposits (usually in 2-3 days) in their bank account from Stripe they can use their confirmation email link to return to ManagedMissions, or login by going to app.managedmissions.com > My Donations > Bank Account. On this screen they will enter their Micro Deposits and verify their bank account, check the box to agree to allow ManagedMissions to use the Bank Account and click Save & Verify
-
5. Integration and Church Management Software
5.1. Planning Center Integration
Go to Account Admin > Integrations > Planning Center Online. Once there you will be prompted to upgrade your account to include this feature. The cost to upgrade to the Planning Center Online integration is an additional $10/month. 
Once you have upgraded your account you will then be able to connect your Planning Center Online account.
After clicking "Connect Planning Center Online" if you are already logged in to Planning Center Online will be automatically connected, or you will be prompted to login to Planning Center Online to connect your account.
When your account is connected you will be able to export your contributions (all contributions, online contributions, or manual contributions) from ManagedMissions to Planning Center Online. This will create a new batch in Planning Center Online. 
5.2. 2.2 Church Community Builder Integration
Connecting Church Community Builder and ManagedMissions
Go to Account Admin > Integrations > Church Community Builder. Once there you will be prompted to upgrade your account to include this feature. The cost to upgrade to the Church Community Builder integration is an additional $10/month.
1. Create a new API user in CCB
Click on the gear button in the top right corner of Church Community Builder when logged in and then go to the API button
2. Click on the "Add new API user" button and fill out all the requested information. Save the information
3. Edit the API user created and select “Services Tab”. Select the next services and click on Save button
4. Copy the API URL from the summary screen of the API section in Church Community Builder Site
5. In ManagedMissions fill in the API URL, API username and password and click on “Connect Church Community Builder”:
On success Connect you should be able to see this screen. If you have troubles during the setup process, please contact us.
5.3. Rock RMS Integration
- Go to www.managedmissions.com
- Click “START NOW” in the top right corner.
- Choose “A Church or Organization Administrator” and flow the registration process.
If you already have signed up follow these steps:
- Login to your account at www.managedmissions.com
- Click on Account Admin
- Click on API --> Introduction
- Generate an API key at the bottom. If an API key already exists, continue to step 5.
- Click on Integrations
- Select Rock (MangedMissions will automatically ask you to add Rock RMS to your paid services if you haven’t already subscribed.)
- Copy the Authentication Code
- Log in to Rock RMS and Paste the Code in the Settings screen in the ManagedMissions Rock RMS Plug-in.

Screenshots for the Rock side of integration.
Here is how:
1) To install this plugin, select Admin Tools > Rock Shop from your own instance of Rock.
2) Click on “ManagedMissions” plugin.
3) Click “Install”.
4) Use your Rock RMS credentials to login and install the plug-in.
5) Copy Authentication Code (Outlined in above steps)
6) Click on gray gear on the right side of the page.
7) Paste Authentication Code in box and click Save Changes.

Additional Plug-in Settings:
There are three additional settings that can be used for the MM + Rock sync process if desired.
- Rock Fundraising Parent Group: By default, ManagedMissions will create a Fundraising Parent Group called “Managed Missions” in your Rock Fundraising Group Tree Picker where imported unmatched Mission Trips from Managed Missions will be placed. If your organization already has an existing Fundraising Group in Rock for Mission Trips, you can choose that group from the Group Picker.
- Rock Fundraising Sync Group: Choose to either have the ManagedMissions plugin search through all of your Rock Groups for matching Mission Trips (Sync All) -or- if you have a lot of groups choose one or more groups under which the ManagedMissions plugin will look for matching Mission Trips. (Choosing where the Plugin searches should always be faster.)
- Contribution Fund Location: This setting is used when importing funds (contributions) from ManagedMissions into Rock. A default Fund group “Mission Fund” is set by Rock for all imported contributions. However, if you would like to change the Fund where imported contributions from ManagedMissions are entered under, you can do so on this screen.
Once all the settings are in place, you will be able to run a “Sync All” from the ManagedMissions plug-in screen.
Once downloaded you will be able to run imports from ManagedMissions.
Trips tab - First page that opens when you log in:

The trips tab allows you to view all of the trips from ManagedMissions available for import into RockRMS.
- Clicking import on a specific trip row will import that specific trip as a new RockRMS Fundraising Group and import all of it’s associated donors, team members and contributions.
- Clicking Import All will run an import of all of the available trips.
- You can filter/search for a specific trip by typing in the search box above.
Trip Members tab Screenshot:

The Trip Member tab allows you to view all of the team members from ManagedMissions available for import into Rock RMS as People.
- Clicking import on a specific team member row will import that specific team member as a new RockRMS Person or match an existing Person in Rock RMS if they exist. It will also create the Fundraising Group for this team member’s trip, any associated import, all of the associated contributions and any donors,and team members.
- Clicking Import All will run an import of all of the available team members.
- You can filter/search for a specific team member by typing in the search box above.
Donor Tab Screenshot:
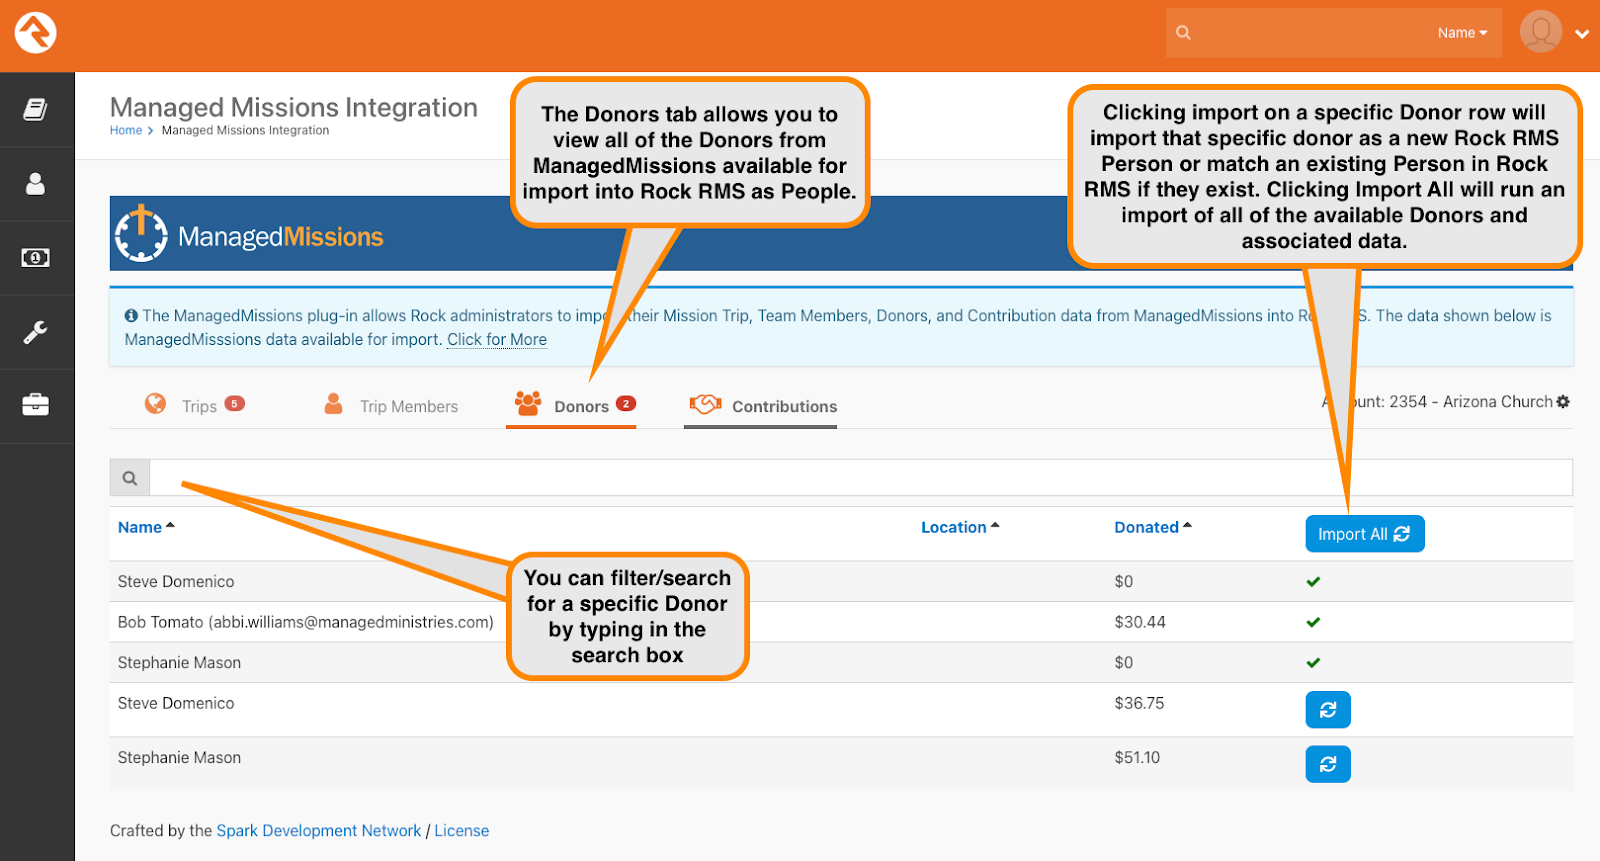
The Donors tab allows you to view all of the Donors from ManagedMissions available for import into Rock RMS as People.
- Clicking import on a specific Donor row will import that specific donor as a new Rock RMS Person or match an existing Person in Rock RMS if they exist. It will also create the Fundraising Group for this team member’s trip, any associated import, all of the associated contributions and any donors, and team members.
- Clicking Import All will run an import of all of the available Donors and associated data.
- You can filter/search for a specific Donor by typing in the search box above.
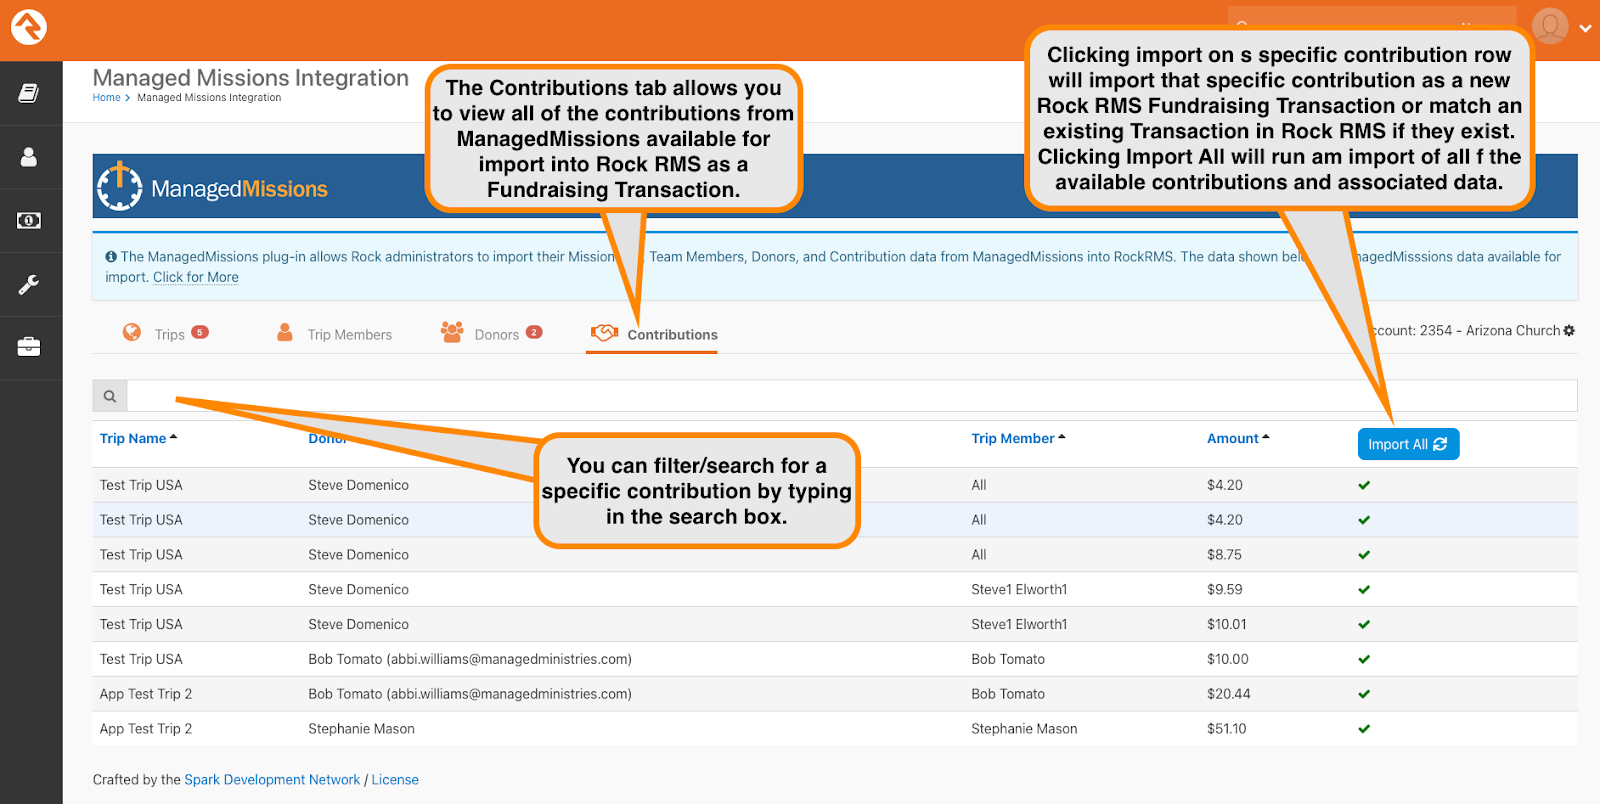
Contributions Tab Screenshot:
The Contributions tab allows you to view all of the contributions from ManagedMissions available for import into Rock RMS as a Fundraising Transaction.
- Clicking import on a specific contribution row will import that specific contribution as a new Rock RMS Fundraising Transaction or match an existing Transaction in Rock RMS if they exist. It will also create the Fundraising Group for this team member’s trip, any associated import, all of the associated contributions and any donors, and team members and. Clicking Import All will run an import of all of the available contributions and associated data.
- You can filter/search for a specific contribution by typing in the search box above.